
How to Create a Demo Request Form in WordPress
Build a WordPress demo request form that asks for the company, team size and goal, acknowledges every request automatically and sends each one to the specialist who should take the call.

A demo request form is a sales form pretending to be a contact form, and the difference is 2 questions: how big is the team, and what are they trying to do. So, if you are looking to add a demo request form to your WordPress site, for a SaaS product, a plugin, an agency service or an onboarding program, this guide can surely help.
I build Core Forms, and every screen here comes from its Software onboarding request template running on a test site.
Every product qualifies leads differently, so one guide cannot cover lead scoring or a calendar that books the demo on the spot. But almost every demo request needs the same things, a person, a company, a team size, a goal and a clear promise of what happens next, and in this one I will try my best to cover those properly, in the 3-step layout the template ships with and on a single page.
The template ships with the plugin, so you can follow along click for click. Or, if you get stuck halfway, support is a message away. Without further ado, let’s get started.
What a Demo Request Form Asks
The Software onboarding request template collects 8 things across 3 steps:
- Your name and Email address are required, and Phone is optional.
- Company or organization is required text, because a demo is booked for a company, not a person.
- Team size is a required select: Just me, 2 to 10, 11 to 50 or More than 50.
- Primary goal is a required select: Initial setup, Migration, Team training or Integration help.
- Anything else we should know? is an optional text area with a 2,000 character limit.
- You may contact me about this request is a required consent checkbox on the last step.
Team size and goal are the 2 fields that make this a demo request form rather than a contact form. Together they tell you who should take the call before anyone reads the message, and a “More than 50” with “Migration” should not wait in the same queue as a “Just me” with “Initial setup.”
Create the Demo Request Form
The industry templates ship in the multi-step layout only, so the search shows one card:
- Go to Core Forms > Add New.
- Type
onboardingin the template search. - Click Use this template on the Software onboarding request card.
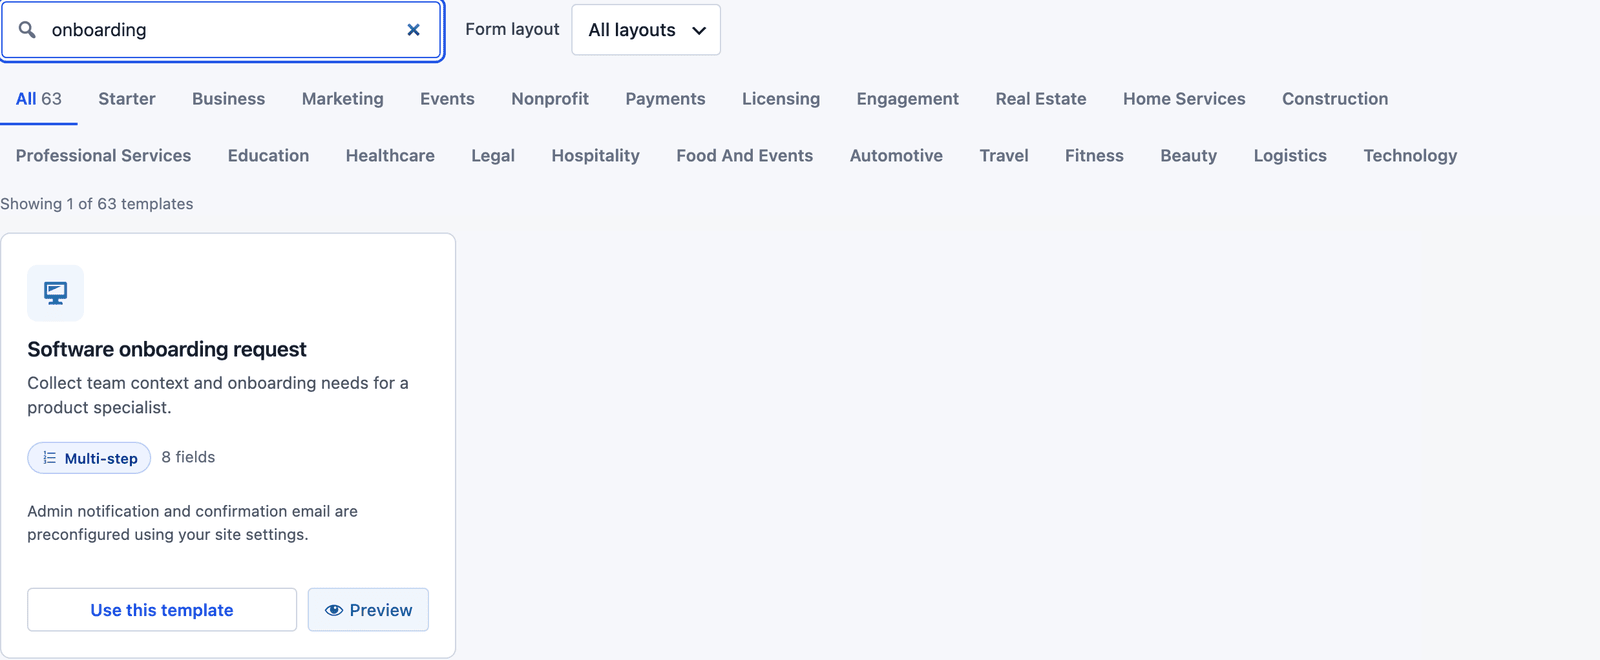 The card notes that the admin notification and the confirmation email are already set up.
The builder opens with 3 steps: “Your details” holds name, email and phone, “Your request” holds the company, team size, goal and message, and “Confirm” holds the consent checkbox and the button.
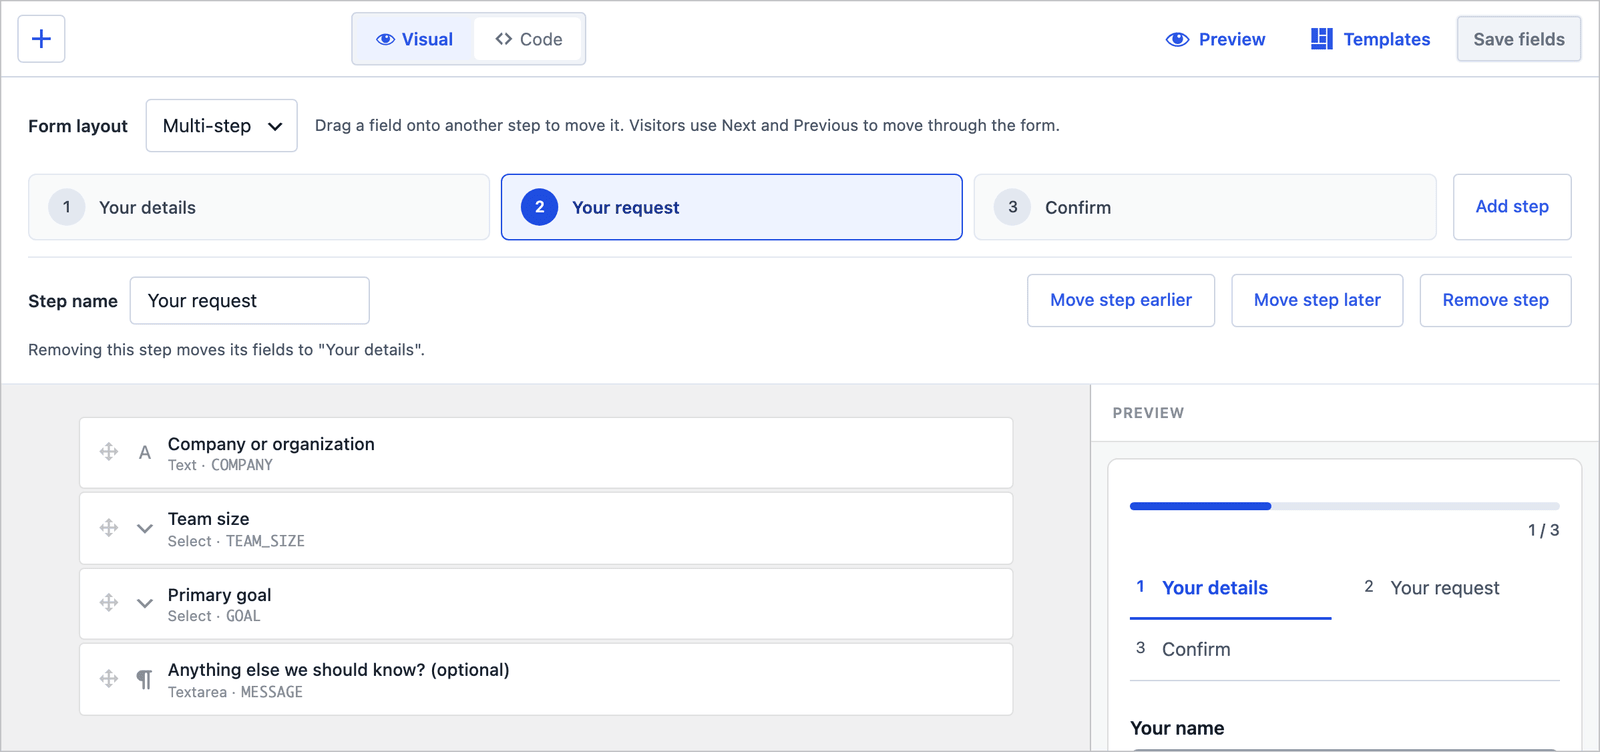 Rename the goal options to match what your product actually helps with before publishing.
Two edits are worth making before the form goes live. Change the button label from “Request onboarding” to “Request a demo” if that is what the page promises, and add a Current tool text field to the “Your request” step if migrations are a big part of your sales. “We are on Typeform” is the single most useful sentence a rep can read before a call.
The 3-Step Layout
On the front end the visitor sees one step at a time, with a progress bar and the step names above the fields.
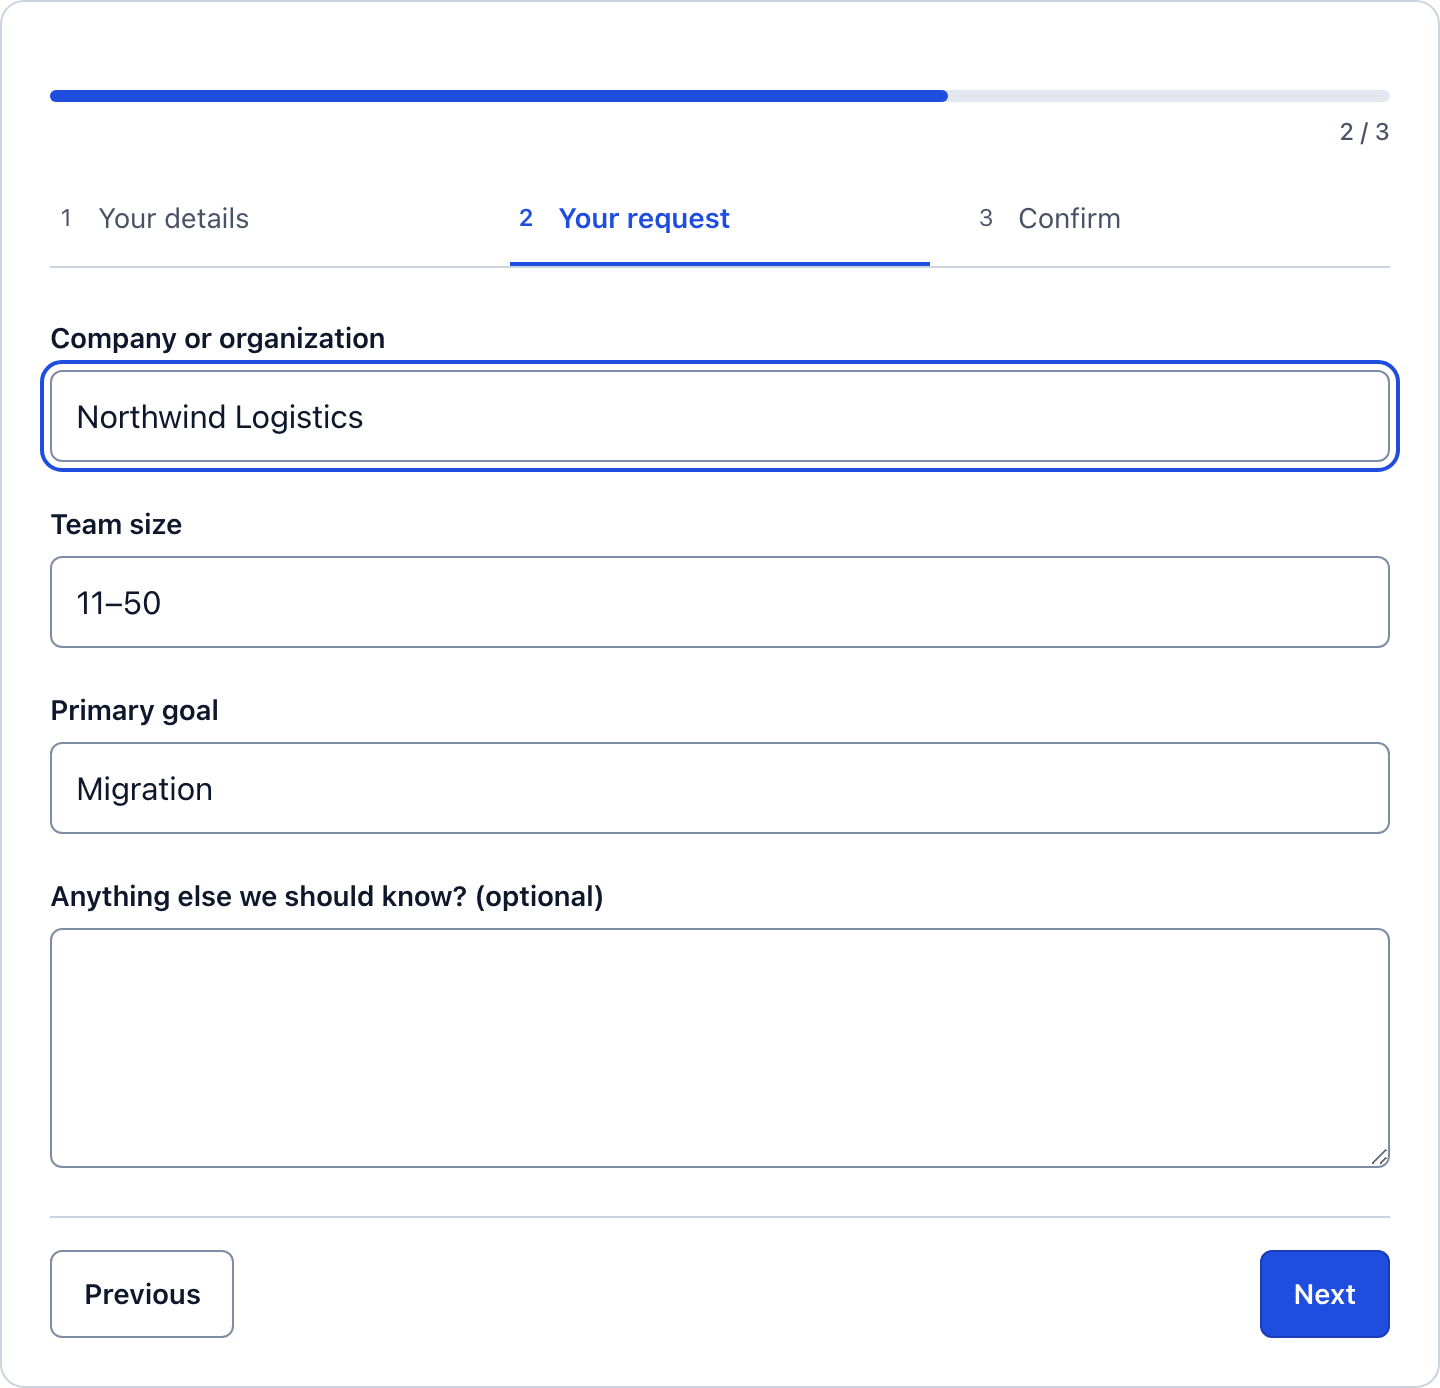 The qualifying questions get a screen of their own, after the visitor has already typed their email.
The order matters here. Name and email come first, so a visitor who abandons on the team size question has still left you a way to follow up. Next validates each step, so a request never arrives without an email address.
Collapse It to One Page
For a form that sits under a pricing table, where the visitor has already read the page and just wants to book, a single page can convert better. In the builder, change Form layout from Multi-step to Single page and click Save fields. The step assignments are kept, so you can switch back.
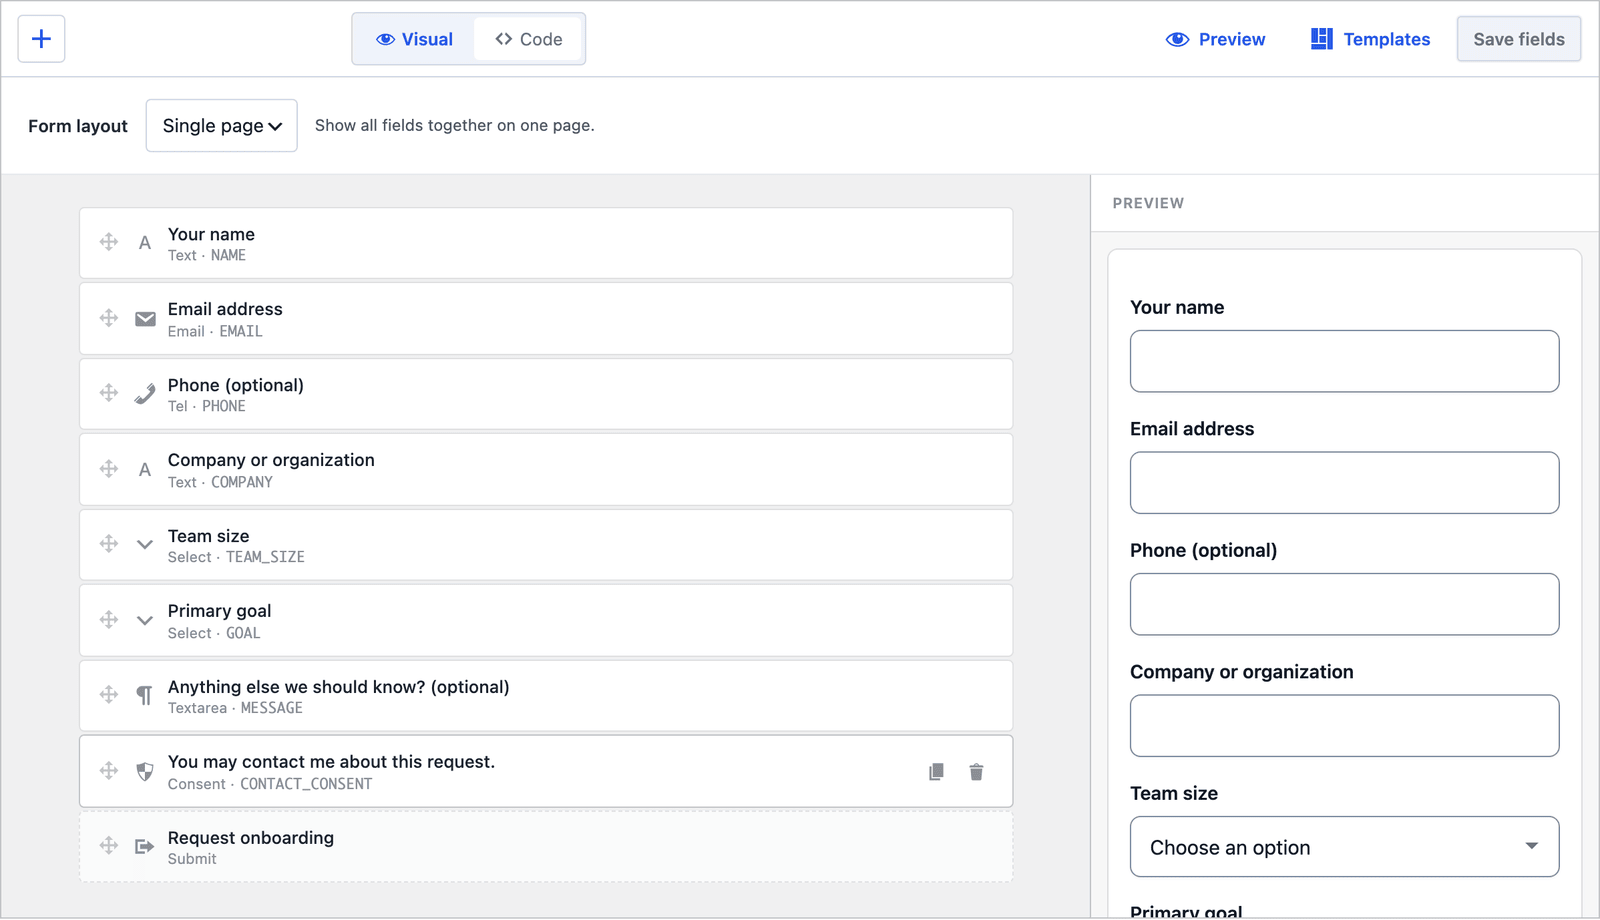 Same fields, same order, no steps.
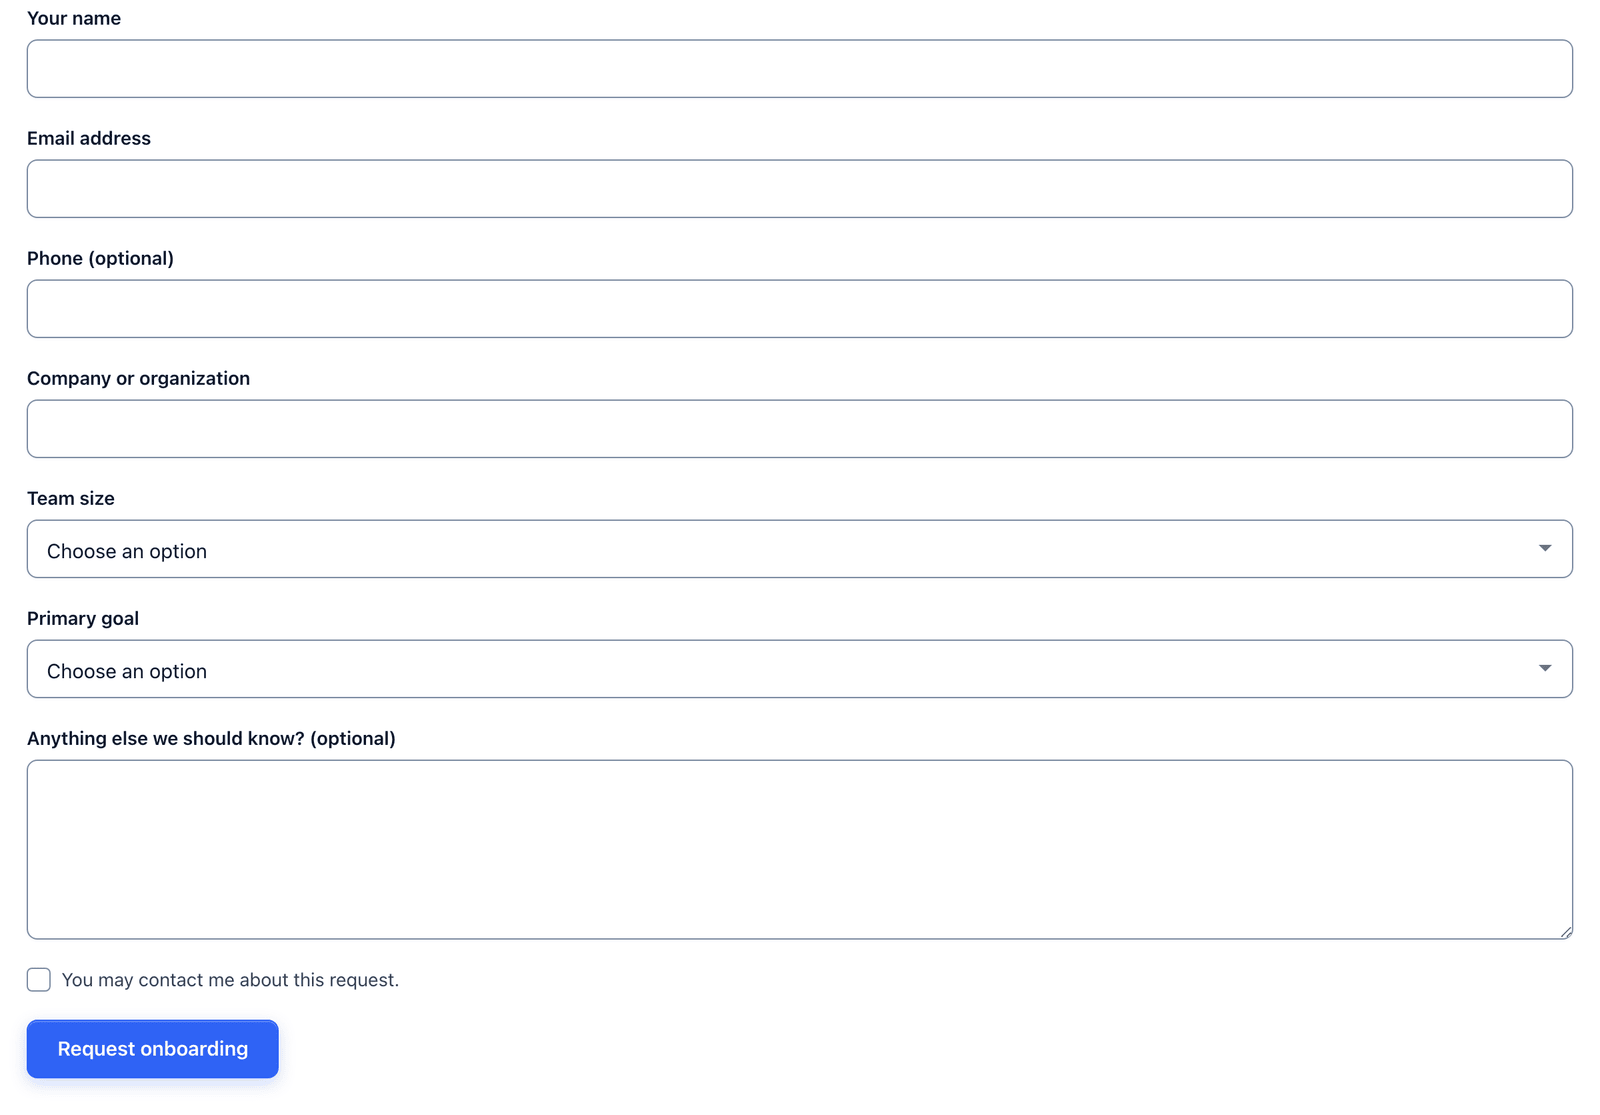 8 fields on one page is still short enough to finish in a minute.
For a demo request I would keep the 3 steps on a landing page and use the single page on a pricing page. A cold visitor from an ad gives their email more readily when the form looks like 2 fields, and a warm visitor from the pricing table wants everything at once.
Two Emails Out of the Box
The template ships with 2 actions already configured:
- Send Email notifies the admin address with the subject “Software onboarding request: [NAME]” and a Reply-To header set to the requester.
- Auto-Responder sends the requester “Software onboarding request - Request received,” with the same success text they saw on screen and an invitation to reply with more details.
Change the auto-responder’s From name to a person, not the company, and add one sentence with the reply time. “Priya will email you within one working day to find a slot” is worth more than any feature list, because the visitor’s next question is always “when.”
Route by Team Size
If a specialist takes the large accounts, recipient routes in the Send Email action send those requests straight to them:
- Open the Actions tab and expand Send Email.
- Under Recipient routes, click + Add route.
- Set When field to Team size, Operator to equals and the value to
more-than-50. - Enter the specialist’s address in Send to and click Save Changes.
The value is the stored option, more-than-50, not the label. The first matching route wins and replaces the default recipient, and the feedback form guide shows the routes screen. A second route on Primary goal equals migration sends migrations to whoever knows the competitor’s export format.
Send It to the CRM
A demo request is a lead, and the inbox is the wrong place for a lead to live. Two actions do the handover:
- A HubSpot action creates or updates the contact with the company name mapped to its company field, and the HubSpot guide walks through it.
- A Pipedrive action opens a deal in your demo pipeline with a follow-up activity for the rep, and the Pipedrive guide covers the mapping.
Both run after the form’s own emails, so the requester gets the acknowledgement even if the CRM is down, and the Pipedrive action has a test panel that sends a sample request before a visitor does.
The Settings the Template Turns On
The Settings tab for an industry template arrives with more switched on than a basic starter:
- Save submissions is on, so every request is stored even if the email fails.
- Prevent duplicates is on, which stops the double-click that sends 2 requests.
- Rate limit is set to 10 submissions per IP per hour.
- Anti-spam shows the honeypot on.
Leave the rate limit alone. Demo request forms get hit by bots that fill every field plausibly, and 10 an hour from one address is the ceiling that lets a real office through and stops a script.
Publish the Demo Request Form
The shortcode is shown next to the form’s name in the editor:
[cf_form slug="software-onboarding-request"]
Paste it into your Request a demo page, or use the Core Forms block. Put the 3 things a visitor wants to know above the form: how long the demo takes, whether it is live or recorded, and who runs it. A form under “30 minutes, live, with an engineer” gets filled in by people who mean it.
Read the Requests
Every request lands in the form’s Submissions tab, with the company, team size and goal in their own columns.
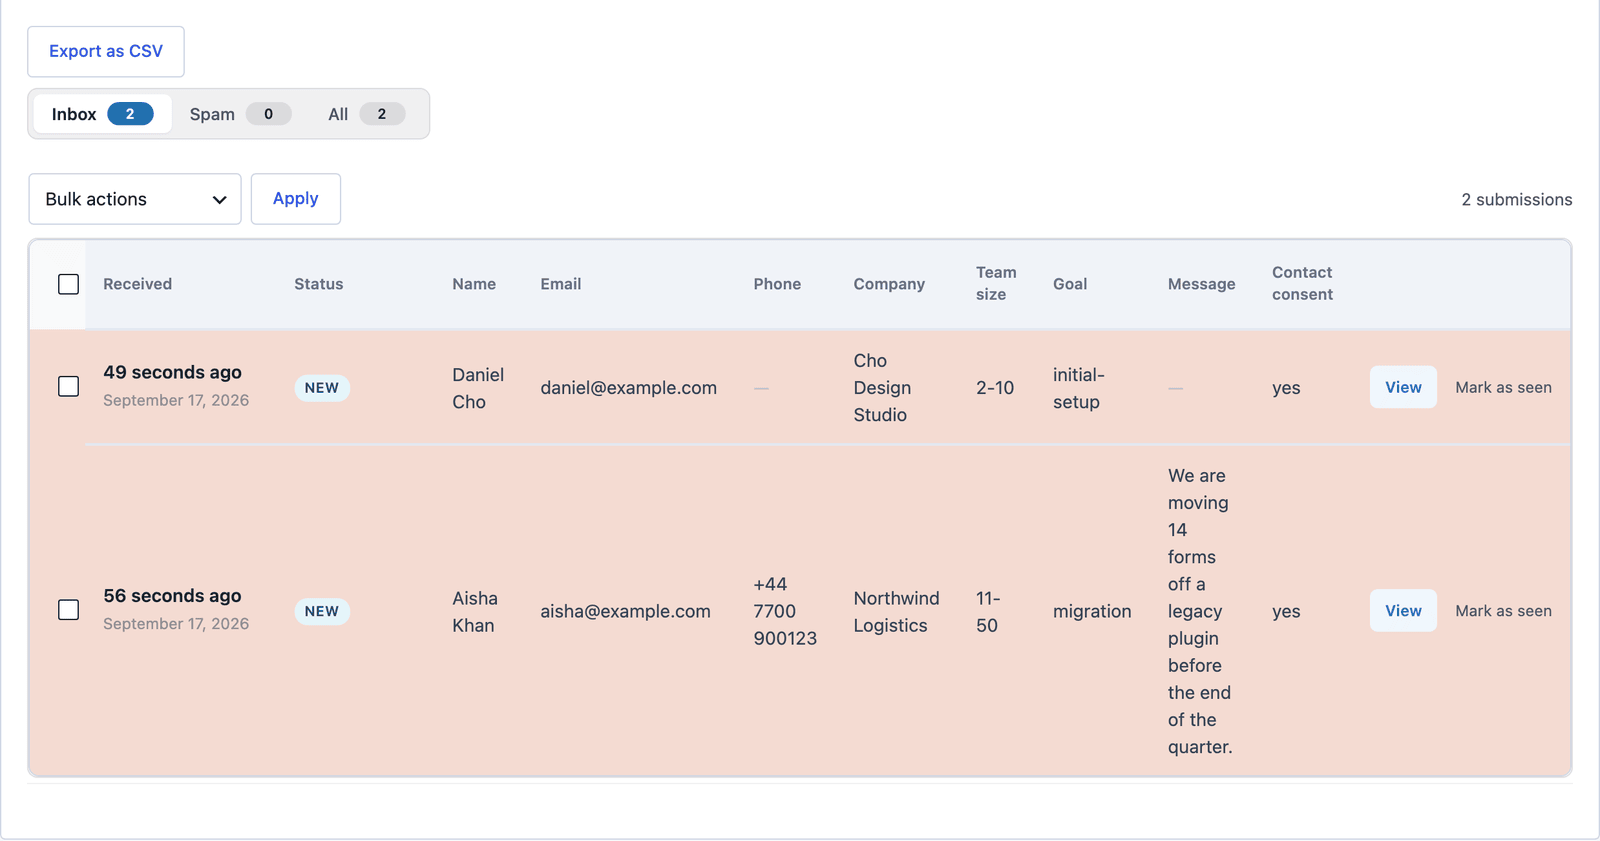 Sort by Team size and the accounts worth a senior rep are at the top.
Click View to read the message and answer from the Send Reply box on the same screen. “Thursday at 3 works, here is the link” is a 10-second reply from here, and for a team that books through a calendar tool, the link goes in the auto-responder instead.
The Limits
The form does not book the demo. It records who wants one and why, and the slot is picked in the reply or through a scheduling link in the auto-responder.
There is no lead scoring. Team size and goal are the score, read by a person, and a CRM action is where a formula belongs if you need one.
Consent to be contacted is not newsletter consent. The checkbox lets you reply about the demo, and a mailing list needs its own opt-in field and an email marketing action.
The template is named for onboarding, because the same 8 fields serve an onboarding request, a demo request and a sales call request. Rename the form and the button, and the fields stay right.
What Quietly Ruins a Demo Request Form
Asking for the phone number as a required field. Half the people who want a demo would rather not be called until they have seen it, and the phone can be asked for in the reply.
Twelve qualifying questions. Team size and goal are enough to route the request, and every question after them costs more leads than it saves rep time.
A success message that says “we will be in touch.” The visitor wants to know when, and a form that says “within one working day” gets fewer “did you get my request?” emails.
Leaving the request in an inbox. A demo request that sits over a weekend is a demo booked with a competitor, and the Slack or CRM action is what moves it out of the inbox the minute it arrives.
Final Remarks
You now have a demo request form that asks the 2 questions that qualify a lead, walks the visitor through them in 3 short steps, acknowledges every request automatically and puts the large accounts where the right rep sees them first. If you keep one idea from this guide, keep this one: team size and goal are the whole qualification, so keep them required and keep the options honest.
The software onboarding request template page has the fields and a live demo, and the industry form templates guide lists the other 15 forms built the same way. If something here does not behave the way this guide describes, the support team can help.
I hope the next request through it is the account you were hoping for.
Once the demo turns into a customer, the onboarding questionnaire is the form that follows.
FAQ
Can the form book the demo slot directly?
Not on its own. Put a scheduling link in the auto-responder so the requester picks a slot the minute they submit, or add a date field to the “Your request” step and confirm the time in the reply.
Can I send demo requests to Slack?
Yes. A Slack action posts the name, company and team size to a channel the moment the request arrives, and the Slack inbox guide shows the message format.
How do I stop fake demo requests?
The template ships with the honeypot, duplicate prevention and a rate limit on. For a form that attracts more, add a Turnstile or reCAPTCHA check in the Settings tab, and keep the consent checkbox required.