Creating Your First Form
Build your first contact form
Watch the full template-to-published-form workflow, then use the detailed steps below.
This guide walks you through creating a form, adding fields, and testing it -- from start to finish.
Step 1: Navigate to Add New
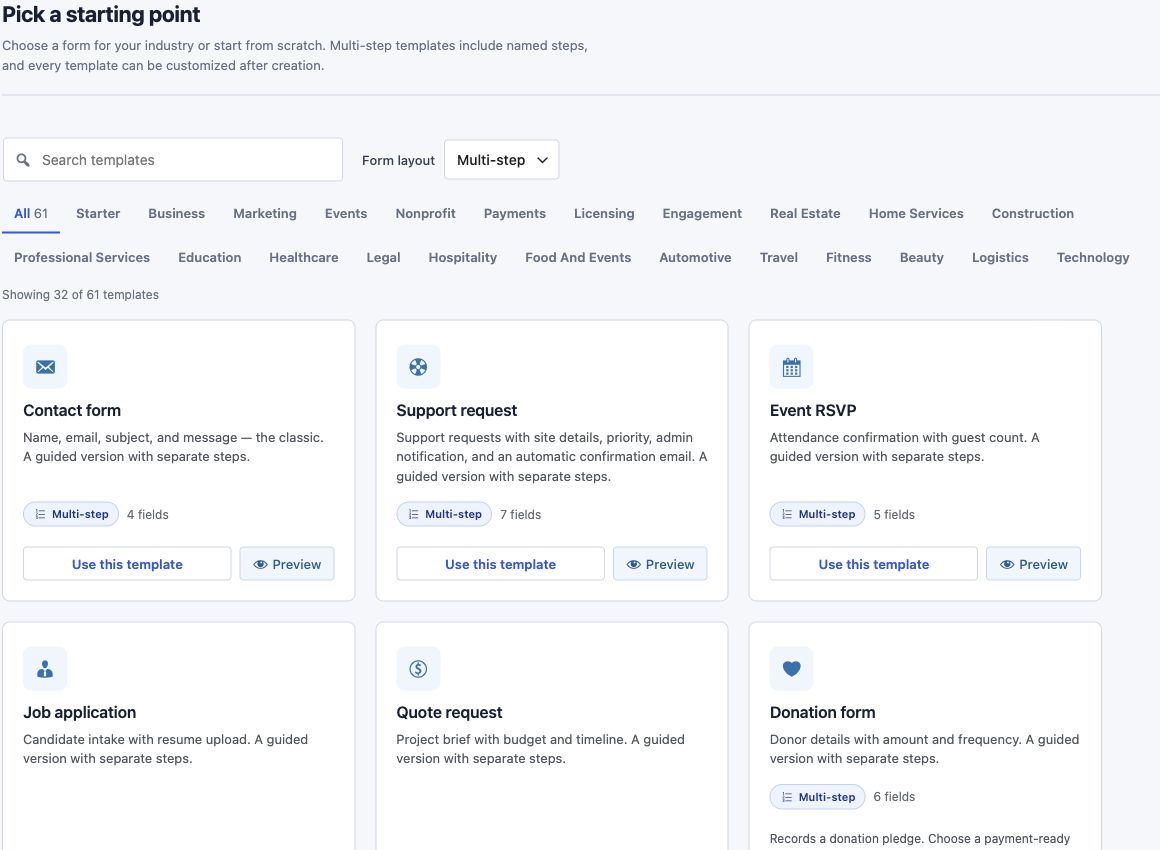
In your WordPress admin, go to Core Forms > Add New.
The Pick a starting point gallery lets you search, filter by category, and choose a Single page or Multi-step layout. Click Use this template to create a form from a sample, or Start blank for an empty form. You can change the form title in the editor.
Step 2: The Form Editor
After creating the form, you land on the form editor. The editor has tabs for fields and form configuration. Common sections include:
| Tab | Purpose |
|---|---|
| Fields | Build your form using the Visual Builder or Code Editor |
| Messages | Customize success, error, and validation messages |
| Settings | Configure submissions, spam protection, scheduling |
| Actions | Set up email notifications, autoresponders, webhooks |
| Submissions | View and manage responses to this form |
The Fields tab is active by default. This is where you build your form.
Step 3: Using the Visual Builder
The Visual Builder is the default editing mode. It provides a drag-and-drop interface for adding and arranging form fields.
The Layout
The Fields tab is split into three areas:
- Field Palette (left sidebar) -- A list of available field types you can add to your form.
- Form Canvas (center) -- A live preview of your form where fields appear as you add them.
- Field Inspector (right sidebar) -- Edit the properties of the currently selected field.
Adding Fields
To add a field, you have two options:
- Click a field type in the palette to append it to the end of the form.
- Drag a field type from the palette and drop it at the desired position in the canvas.
Available field types:
| Field Type | HTML Element | Use Case |
|---|---|---|
| Text | <input type="text"> |
Names, subjects, short answers |
<input type="email"> |
Email addresses | |
| Textarea | <textarea> |
Messages, long-form responses |
| Dropdown | <select> |
Predefined choices |
| Checkbox | <input type="checkbox"> |
Multiple selections, consent |
| Radio | <input type="radio"> |
Single selection from options |
| Number | <input type="number"> |
Quantities, ages, ratings |
| Phone | <input type="tel"> |
Phone numbers |
| URL | <input type="url"> |
Website addresses |
| Date | <input type="date"> |
Dates and appointments |
| Hidden | <input type="hidden"> |
Tracking data, internal IDs |
| File Upload | <input type="file"> |
Documents, images (extension) |
| Submit | <button type="submit"> |
Form submission button |
| HTML | Any HTML | Custom content, headings, text |
Reordering Fields
Drag any field in the canvas to move it to a new position. A blue insertion line shows where the field will land when you drop it.
Editing Field Properties
Click any field in the canvas to select it. The Field Inspector on the right shows editable properties:
- Label -- The field's visible label text.
- Name -- The HTML
nameattribute. This is the key used in submission data and email variables (e.g.,[your-name]). Automatically generated from the label, but you can customize it. - Placeholder -- Hint text shown inside the field before the user types.
- Required -- Toggle to make the field mandatory.
- CSS Class -- Add custom CSS classes to the field wrapper.
- Width -- Set the field to full width, half width, or third width for multi-column layouts.
Some field types have additional properties:
- Dropdown / Radio / Checkbox: An "Options" editor where you add, remove, and reorder choices.
- Textarea: A "Rows" setting to control the height.
- Number: Min, max, and step values.
- File Upload: Accepted file types and max file size.
Removing Fields
Select a field in the canvas and click the trash icon in the Field Inspector, or press the Delete key.
Step 4: Using the Code Editor
Click the Code tab in the toolbar above the canvas to switch to the Code Editor. This gives you direct access to the form's raw HTML.
How It Works
Core Forms stores forms as plain HTML. The Visual Builder generates HTML from fields; the Code Editor lets you write or edit that HTML directly. The two modes stay in sync -- changes in one are reflected in the other.
Example: A Basic Contact Form
<p>
    <label for="name">Name</label>
    <input type="text" name="name" id="name" placeholder="Your name" required />
</p>

<p>
    <label for="email">Email</label>
    <input type="email" name="email" id="email" placeholder="you@example.com" required />
</p>

<p>
    <label for="message">Message</label>
    <textarea name="message" id="message" rows="5" placeholder="How can we help?" required></textarea>
</p>

<p>
    <button type="submit">Send Message</button>
</p>
Key HTML Rules
- Every input needs a
nameattribute. This is how Core Forms identifies the field in submissions and email variables. - Use
requiredto make fields mandatory. Core Forms validates required fields server-side. - Wrap fields in
<p>,<div>, or any block element. The wrapper tag is configurable in global settings. - You can use any valid HTML -- headings, paragraphs,
<fieldset>and<legend>,<div>grids, etc. - Do not include
<form>tags. Core Forms wraps your markup in a<form>element automatically. - Do not include a submit button if you are using the Visual Builder's Submit field. If writing raw HTML, add your own
<button type="submit">.
Conditional Fields
Show or hide fields based on other field values using data-show-if and data-hide-if attributes:
<p>
    <label>How did you hear about us?</label>
    <select name="source">
        <option value="">Select...</option>
        <option value="search">Search engine</option>
        <option value="social">Social media</option>
        <option value="referral">Referral</option>
        <option value="other">Other</option>
    </select>
</p>

<!-- This field only appears when "other" is selected -->
<p data-show-if="source=other">
    <label for="source_other">Please specify</label>
    <input type="text" name="source_other" id="source_other" />
</p>
Template Variables
You can use template variables in your form HTML that are replaced with dynamic values:
<!-- Pre-fill with the logged-in user's email -->
<input type="email" name="email" value="{{user.email}}" />

<!-- Include the current page URL -->
<input type="hidden" name="page_url" value="{{post.url}}" />

<!-- Capture a URL parameter -->
<input type="hidden" name="campaign" value="{{url_params.ref}}" />
Available variables:
| Variable | Output |
|---|---|
{{user.email}} |
Logged-in user's email address |
{{user.first_name}} |
Logged-in user's first name |
{{user.last_name}} |
Logged-in user's last name |
{{post.ID}} |
Current post/page ID |
{{post.title}} |
Current post/page title |
{{post.url}} |
Current page URL |
{{url_params.KEY}} |
Value of ?KEY=value in the URL |
Step 5: Choosing a Starting Template
When you create a new form and open the Visual Builder, you can start from a pre-built template instead of a blank canvas. Click the template selector in the toolbar to choose from:
| Template | Fields Included |
|---|---|
| Blank | Empty form -- start from scratch |
| Contact | Name, email, subject, message, submit |
| Feedback | Rating, category, comments, submit |
| Newsletter | Email, first name, subscribe button |
| Support | Name, email, priority, department, description, submit |
| Event Registration | Name, email, phone, number of guests, dietary needs, submit |
Templates provide a starting point. After selecting one, you can add, remove, or modify any field.
Step 6: Saving the Form
Click the Save Changes button at the bottom of the form editor (or at the bottom of any tab). The form is saved as a WordPress post of type core-form.
After saving, notice the form's slug in the editor. The slug is auto-generated from the title (e.g., "Contact Form" becomes contact-form) and is what you use to embed the form.
About the Form Slug
The slug is a URL-safe identifier for your form. You will use it when embedding the form with shortcodes or the Gutenberg block. Some tips:
- The slug is generated from the title, but you can edit it manually.
- Keep slugs short and descriptive:
contact,newsletter,job-application. - Slugs must be unique across all your forms.
- Changing a slug after embedding will break existing shortcodes -- update them to match the new slug.
Step 7: Setting Up an Email Action
Before testing, you probably want to receive submissions via email. Switch to the Actions tab:
- Click Add Action.
- Select Send Email as the action type.
- Configure the email:
- To: The email address that should receive submissions (defaults to the site admin email).
- Subject: The email subject line. You can use data variables like
[subject]or[name]. - Message: The email body. Use[all:label]to include all form fields with their labels, or reference individual fields like[name],[email],[message]. - Click Save Changes.
Example email configuration:
To:      admin@example.com
Subject: New contact form submission from [name]
Message: You received a new message:

[all:label]

Reply to this person at [email].
Step 8: Testing with Preview
Before embedding the form on a live page, test it with the built-in preview:
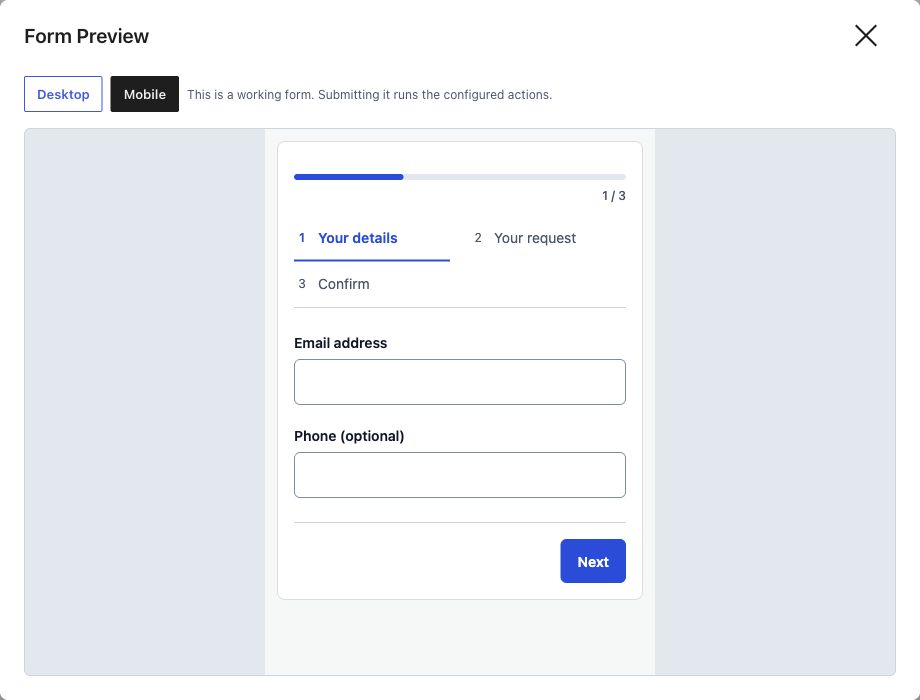
- In the Fields toolbar, click Preview, or Save & preview when there are unsaved field edits.
- The Form Preview dialog opens with Desktop and Mobile controls. It loads Core Forms assets independently of the WordPress theme.
- Use test data to fill in the fields. Submitting this working preview runs configured actions, so review recipients and payment test mode first.
- Verify the success message appears and the submission shows up in the Submissions tab.
What to Check
- All fields render correctly with proper labels.
- Required fields show validation errors when left empty.
- Conditional fields appear and disappear based on selections.
- The success message (or redirect) works after submission.
- The submission data is saved (check the Submissions tab).
- Email notifications are sent (if you configured an Email action).
Checking Submissions
After submitting the test form, go back to the form editor and click the Submissions tab. You should see your test submission listed with:
- The date and time of submission.
- All field values you entered.
- The IP address and user agent of the submitter.
- The referrer URL (the page the form was on).
Click a submission to view full details, reply via email, or delete it.
Troubleshooting
Form shows "Please enable JavaScript"
This <noscript> message is built into every form. It only appears when JavaScript is disabled in the browser. Core Forms requires JavaScript for AJAX submission. If you see this while testing, check that your browser has JavaScript enabled.
Fields are not saving
Make sure every field has a unique name attribute. Fields without a name attribute are not included in the submission data.
Visual Builder is not loading
The Visual Builder requires the WordPress admin JavaScript environment. If it does not load, check for JavaScript errors in your browser console (F12 > Console tab). Conflicts with other plugins that load heavy JavaScript on admin pages are the most common cause.
Email notifications not arriving
- Check your spam/junk folder.
- Verify the "To" address in the Email action is correct.
- Consider using an SMTP plugin or the Emailit integration (see global settings) for reliable email delivery. Default WordPress
wp_mail()is often filtered by hosting providers. - Check the Email Logs page (Core Forms > Email Logs) to see if the email was sent and its delivery status.
Next Steps
- Embed your form on a page using a shortcode or Gutenberg block
- Configure form settings including spam protection and scheduling
- Set up email notifications to receive submissions in your inbox