
WordPress PayPal Integration: Build a PayPal Payment Form Without a Cart Plugin
Set up a WordPress PayPal integration that takes a payment on form submit, holds the entry as pending until PayPal's webhook confirms it, and only then sends the emails and runs the actions.

A WordPress PayPal integration on a form is for the cases a cart plugin makes heavy: a donation, a deposit, a single product, a workshop seat. The form asks its questions, sends the person to PayPal for the money and comes back with a paid submission. So, if you are looking to add a PayPal payment form to your WordPress site without installing a store, this guide can surely help.
I build Core Forms, and PayPal is one of the 4 payment gateways built into it. Every screen here comes from its Donation (PayPal) template running on a test site in sandbox mode.
PayPal has several products, so one guide cannot cover subscriptions, invoicing or PayPal buttons pasted into a page. But almost every form that takes a PayPal payment needs the same 4 things, credentials, a webhook, an amount and a rule about what happens before the money arrives, and in this one I will try my best to cover those properly.
There is nothing to download, because the gateway is part of the plugin. Or, if you get stuck halfway, support is a message away. Without further ado, let’s get started.
How a PayPal Payment Form Works
Before the settings, the idea, because it decides how you should read every screen after it. A payment form has 2 halves, and the second half is the one that matters.
The first half is the redirect. The visitor submits the form, the submission is saved with the status pending payment, and the browser goes to PayPal’s checkout with the amount and a description. The second half is the webhook. When PayPal captures the payment, it posts a signed message to your site, the submission is marked paid, and only then do the email notifications and every other action run.
The return trip from PayPal is not the proof. A visitor can come back to your thank-you page without paying, by editing the URL, and the form treats that as a hint, not a payment. Until the webhook arrives, the submission stays pending and nothing is sent. That rule is what makes a form safe to use for money, and it is why the webhook step below is not optional.
Create the PayPal Credentials
PayPal’s REST API uses a client ID and a secret from an app you create in the developer dashboard:
- Go to developer.paypal.com and open Apps & Credentials.
- Switch to Sandbox first, click Create App and name it after your site.
- Copy the Client ID and the Secret.
- Under the app’s Webhooks, click Add Webhook, paste your site’s webhook URL (shown in the next step) and subscribe to
CHECKOUT.ORDER.APPROVED,PAYMENT.CAPTURE.COMPLETED,PAYMENT.CAPTURE.REFUNDEDandPAYMENT.CAPTURE.DENIED. - Copy the Webhook ID PayPal shows after saving.
Repeat the app and the webhook under Live when you are ready to take real money. Both sets of credentials can be saved at once, and a single switch chooses which one is active.
Enter the Credentials in Core Forms
Go to Core Forms > Settings and open the Payments section:
- Choose Test mode, which uses the sandbox credentials and charges nobody.
- Expand PayPal. The webhook URL for your site is shown at the top of the card,
/wp-json/cf/v1/payments/paypal/webhook, which is what you paste into PayPal in the step above. - Enter the sandbox client ID and secret, and the webhook ID.
- Click Save settings. The PayPal card shows Configured.
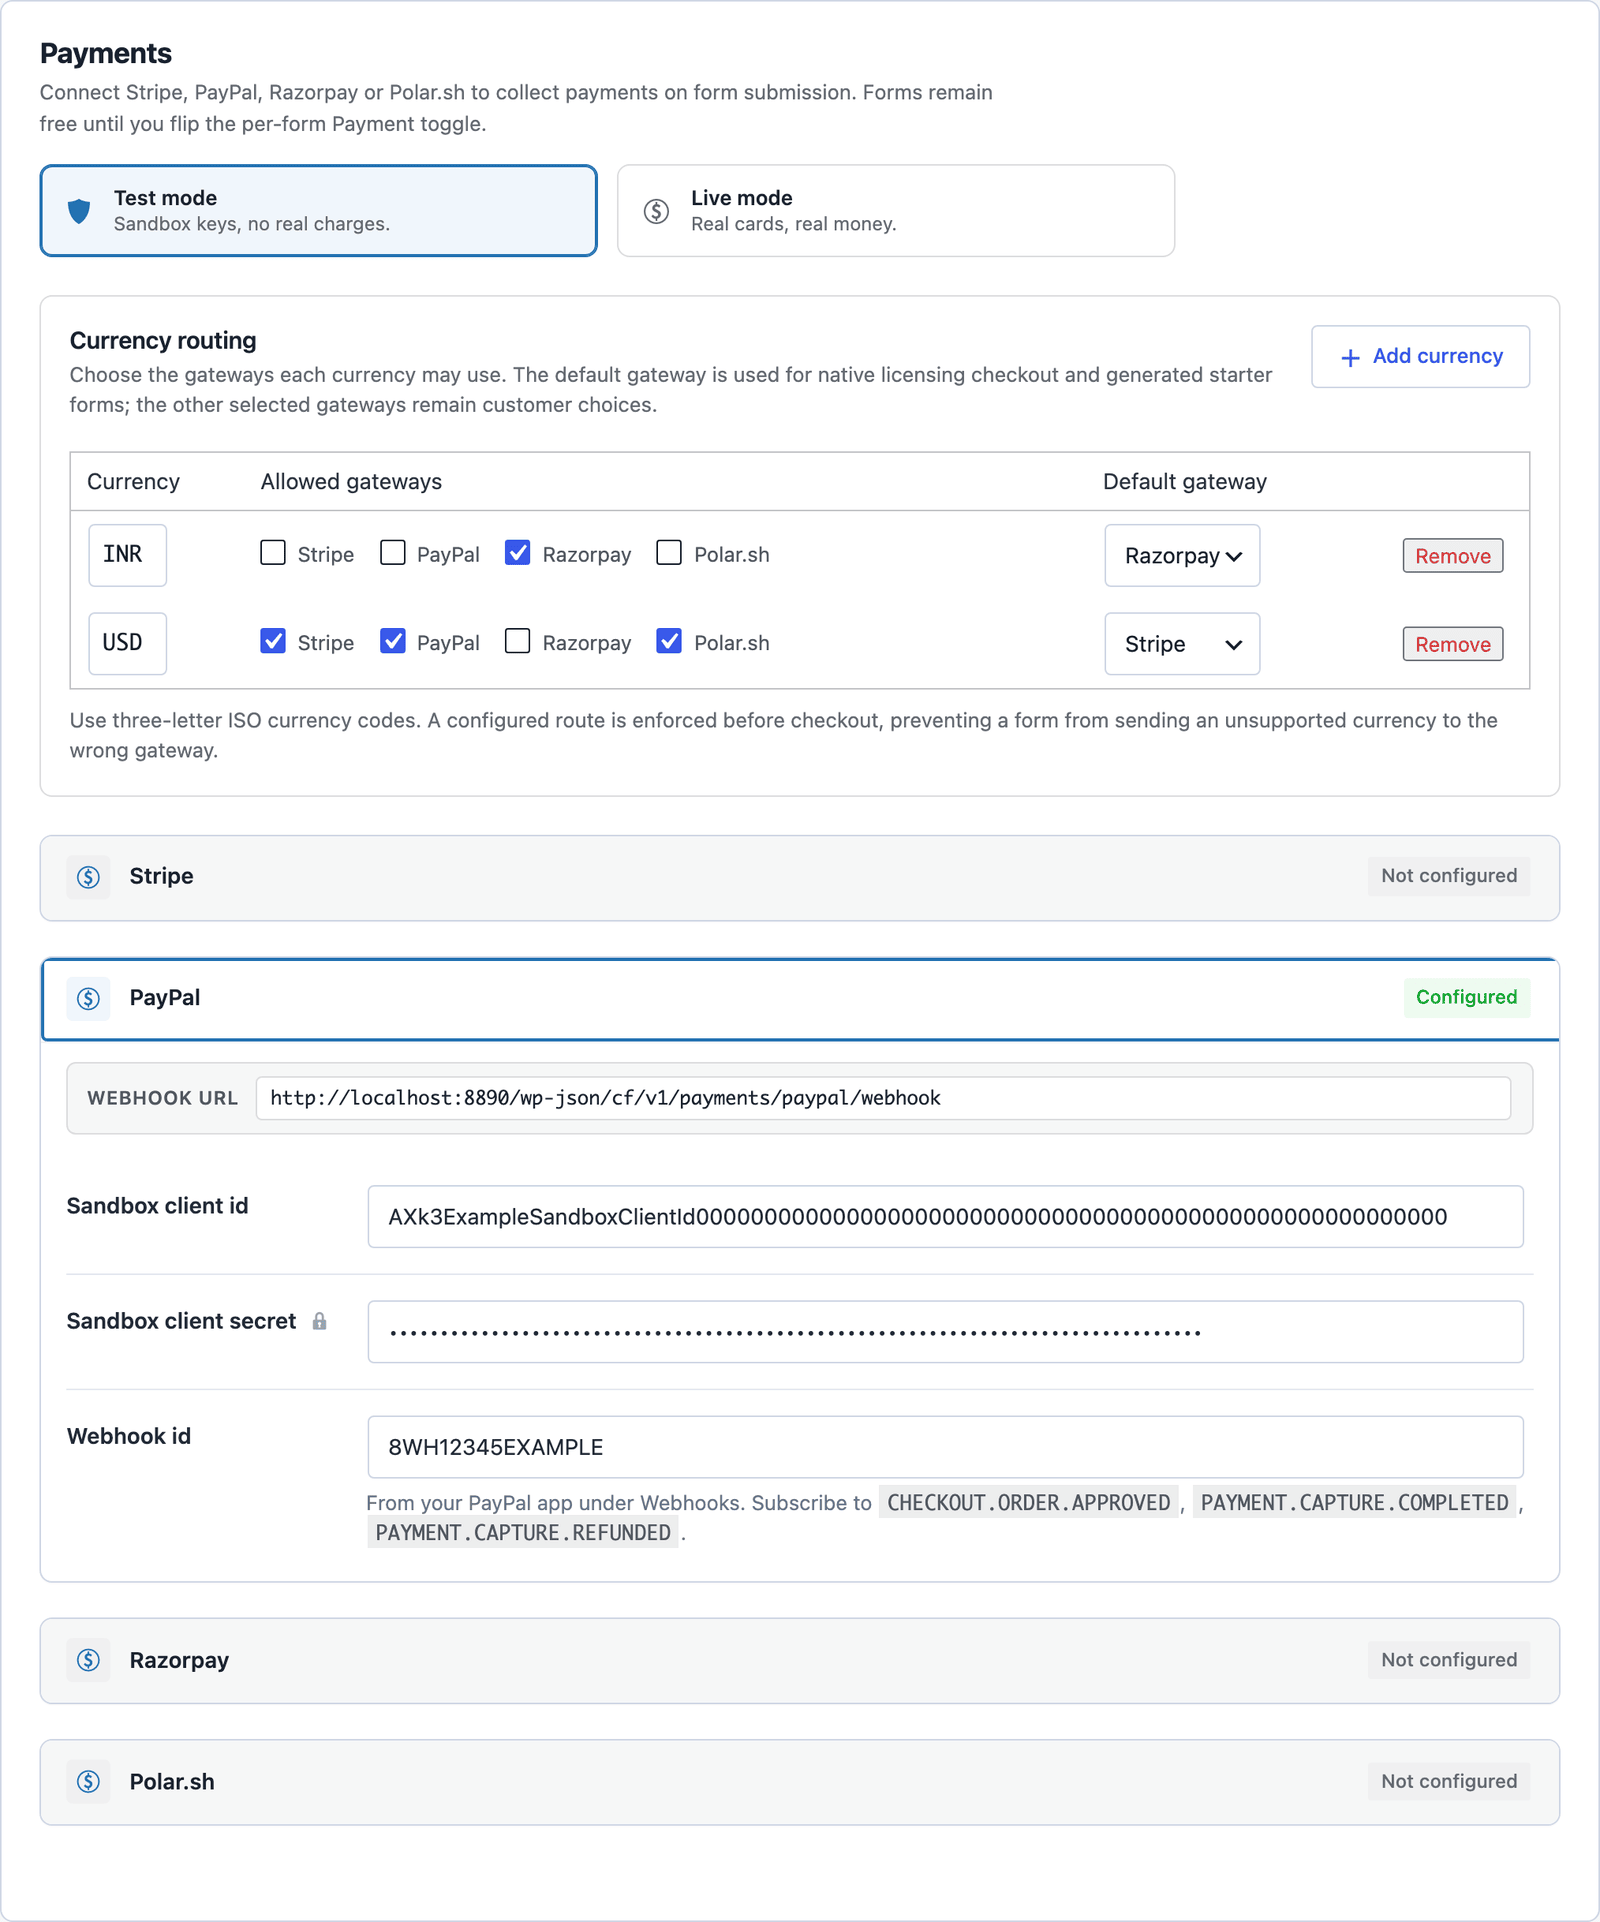 One switch moves every form on the site between sandbox and live, so no form is ever half in test mode.
The Currency routing table above the gateways decides which gateway may take which currency. A USD form can be offered Stripe, PayPal and Polar; an INR form is routed to Razorpay. A route is checked before checkout, so a form cannot send a currency to a gateway that does not accept it.
Start From a PayPal Template
Two templates ship with PayPal preselected, one for a fixed-price product and one for a donor-chosen amount:
- Product purchase (PayPal) asks for a name, an email and delivery notes, and charges a fixed amount you set.
- Donation (PayPal) asks for a name, an email, an amount in USD and an optional message, and charges whatever the donor typed.
Go to Core Forms > Add New, type paypal in the search and click Use this template on the one you want. The form’s Payment tab is already filled in:
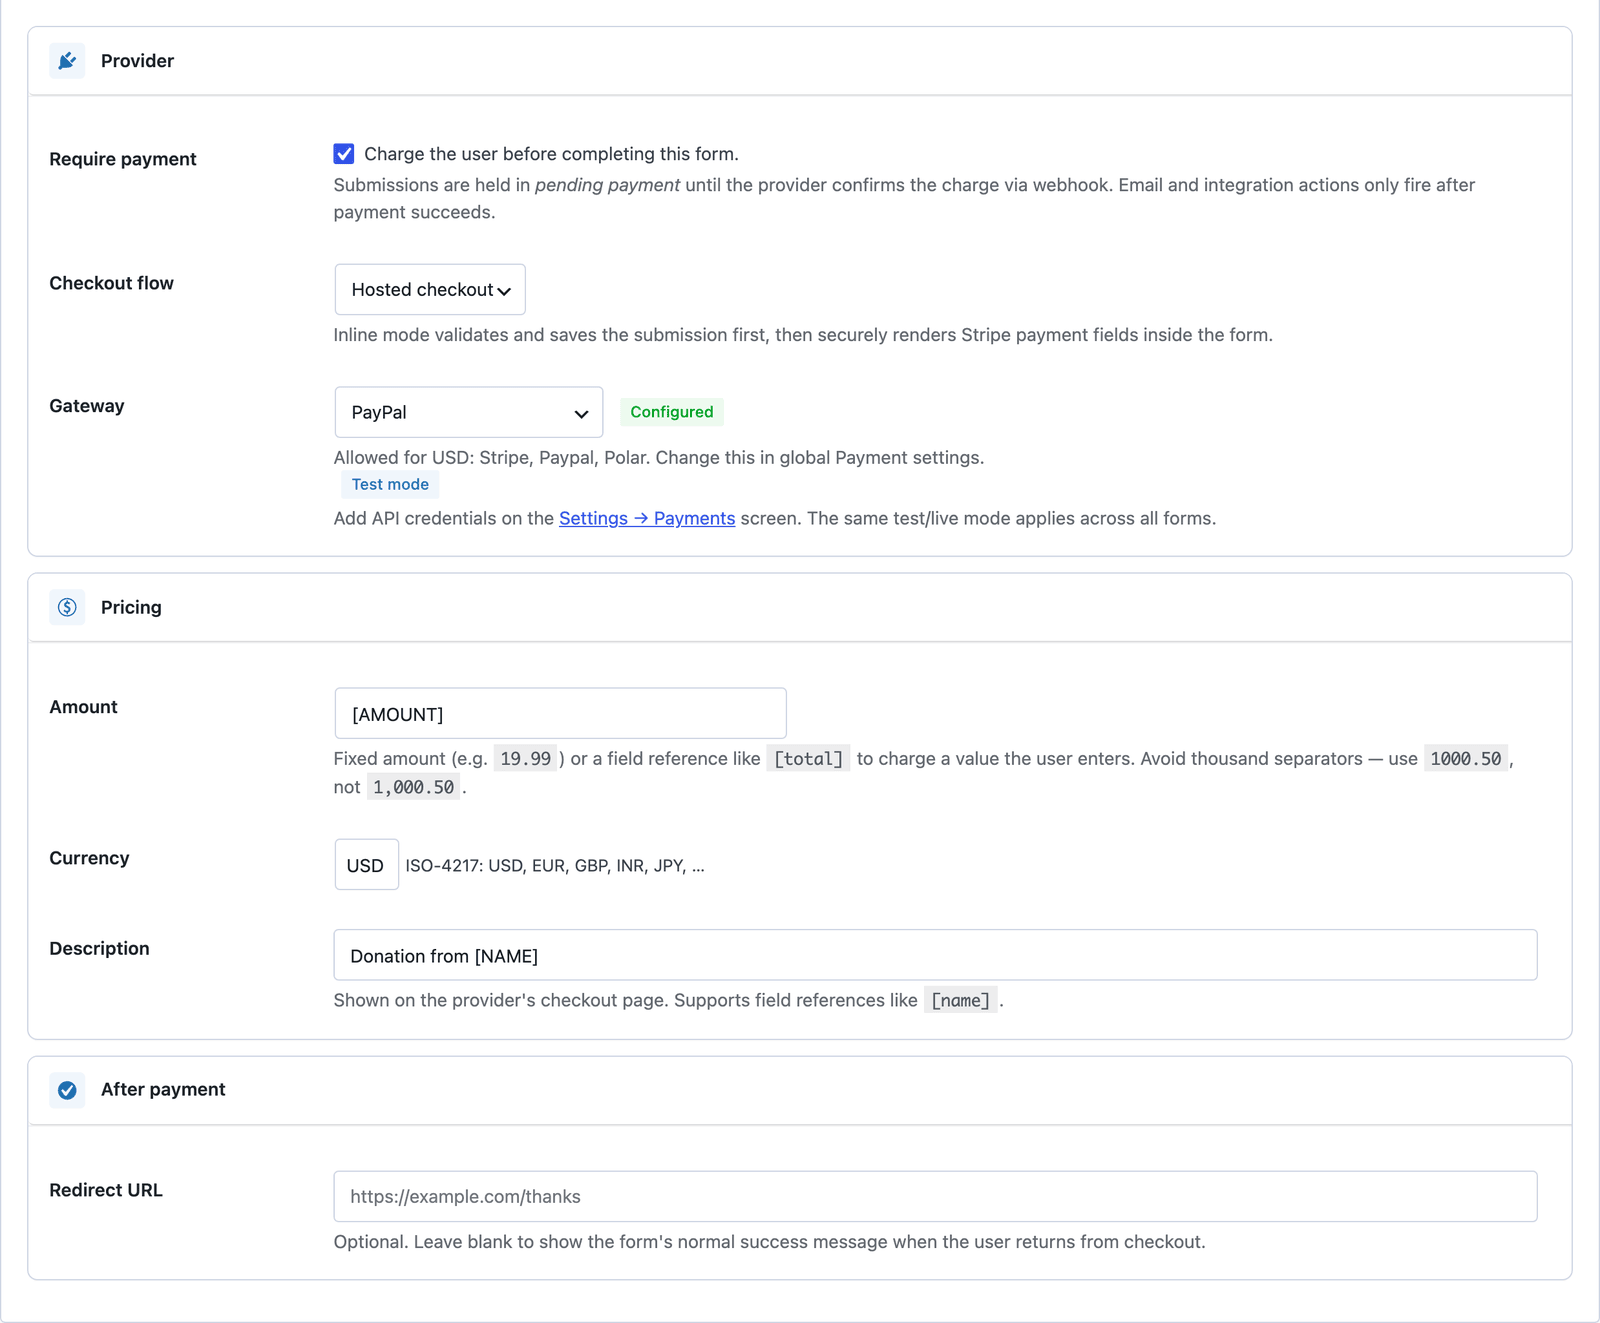 The amount is a field reference, so the donor’s number is the charge. A product form puts a fixed number here instead.
The tab has 3 parts worth reading once:
- Provider holds the Require payment switch, the checkout flow and the gateway. PayPal is hosted checkout only; the inline flow that keeps the visitor on the page is Stripe’s.
- Pricing holds the amount, a fixed value such as
19.99or a field reference such as[AMOUNT], the 3-letter currency and a description that appears on PayPal’s checkout page. Field variables work in the description too, so “Donation from [NAME]” shows the donor their own name. - After payment holds an optional redirect URL. Left blank, the visitor returns to the form’s normal success message.
Publish the Form
The shortcode is shown next to the form’s name in the editor:
[cf_form slug="donation-paypal"]
Paste it into a Donate page, or use the Core Forms block.
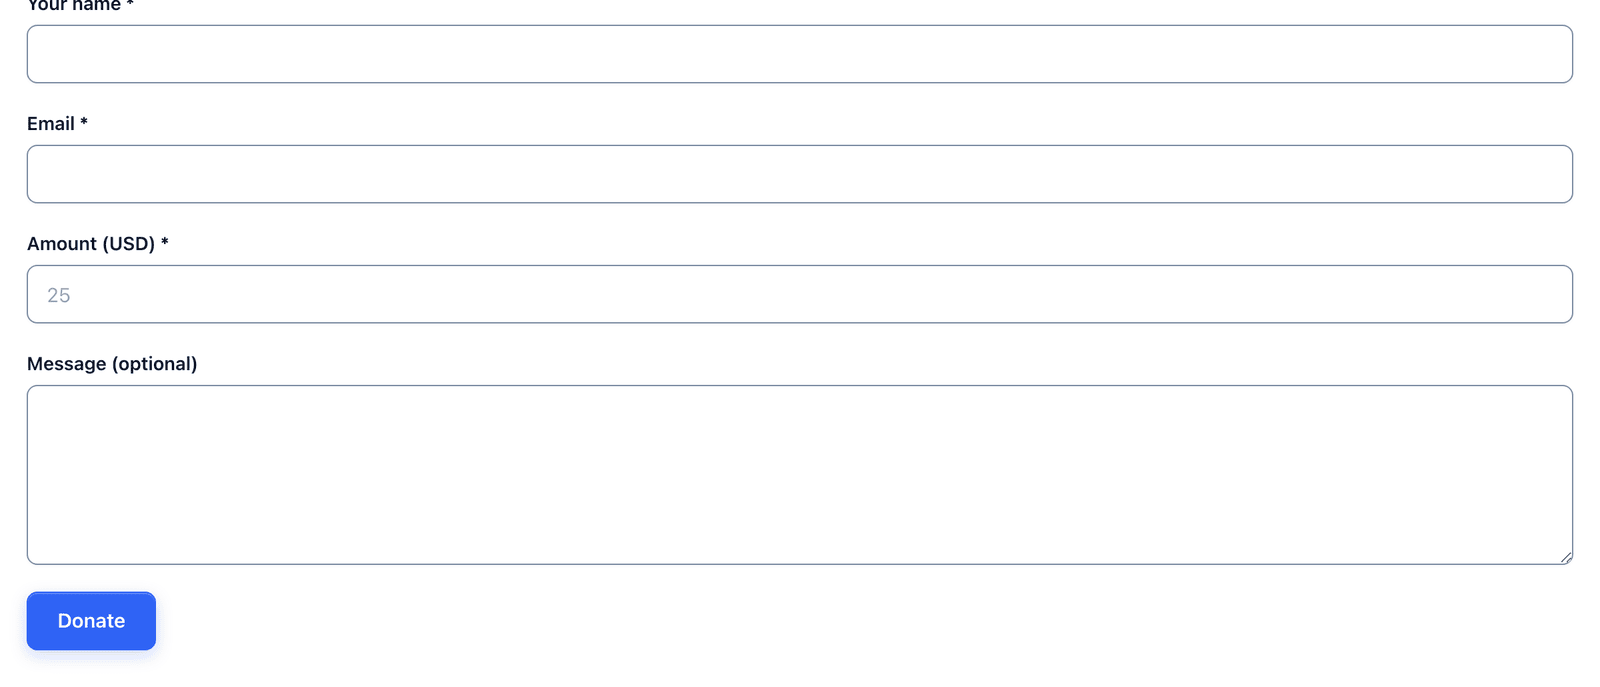 Four fields, then PayPal. The form never sees a card number.
Put the amount rules above the form in plain text, such as “Any amount from $5,” because the amount field’s minimum is what enforces it and the text is what stops the confused submissions.
Test a Payment in the Sandbox
With Test mode on, submit the form and pay with a sandbox buyer account from PayPal’s developer dashboard. Then check 3 places:
- The form’s Submissions tab shows the entry as paid instead of pending payment.
- Core Forms > Email Logs shows the notification, sent after the webhook arrived, not at submit time.
- PayPal’s webhook page for the app shows the events delivered to your site with a 200 response.
If the submission stays pending after paying, the webhook is the problem. The 2 usual causes are a webhook ID that does not match the one PayPal shows for the app, and a site behind a login or a firewall that blocks PayPal’s request. Fix the webhook, and the pending submission is marked paid when PayPal retries the delivery, or when you replay the event from PayPal’s dashboard.
When it works in the sandbox, switch the app to live in PayPal, enter the live credentials and webhook ID in the same card, and flip the mode to Live.
What Runs After the Money Arrives
Every action on the form waits for the paid status. The admin notification, the auto-responder, a HubSpot contact, a Google Sheets row, all of them run only after PayPal’s webhook confirms the capture. A visitor who abandons checkout leaves a pending submission and no emails.
That is the right default for money, and it has a consequence: the confirmation email is the receipt. Put the amount and the PayPal reference in the auto-responder with the [all:label] variable and a line about refunds, because that email is the record the donor keeps. The payment form workflow guide covers the rest of the after-payment logic, including fulfilling something exactly once.
A refund posts its own webhook event, and the submission is marked refunded. Nothing is sent to the customer automatically at that point, which is deliberate, because a refund usually comes with a conversation.
The Limits
PayPal on a form is hosted checkout. The visitor leaves your page to pay and comes back. Keeping the payment on the page is a Stripe feature, not a PayPal one.
There is no subscription or recurring charge through the PayPal gateway. One form, one order. Recurring billing is a job for a store, and the FluentCart checkout feature covers that route.
The amount is what the form calculates or the visitor types. There is no cart, no quantity picker and no shipping calculation. A product form charges one price; a donation form charges the number in the field.
Test and live are a site-wide switch. You cannot run one form in the sandbox while another takes real money.
Refund and dispute handling happen in PayPal. The form records the refund event; issuing it is a PayPal action.
What Quietly Ruins a PayPal Payment Form
Skipping the webhook because the sandbox test “worked.” The redirect back to your site looks like success, and without the webhook the submission never leaves pending and the receipt never goes out.
Charging a field the visitor can edit on a product form. The amount belongs in the Payment tab as a fixed number, so a visitor cannot change the price by editing the page.
Putting card details or a PayPal login field on the form. Neither belongs there, and neither is needed. PayPal’s checkout page takes the payment.
Going live with the sandbox webhook ID. Live and sandbox are separate apps with separate webhook IDs, and a live payment with the sandbox ID fails signature verification and stays pending.
Final Remarks
You now have a WordPress form that takes a PayPal payment, holds the submission until PayPal confirms the money and only then sends the receipt and runs the actions, with a single switch between sandbox and live. If you keep one idea from this guide, keep this one: the webhook is the proof of payment, and the return page is just a page.
The PayPal integration page has the short setup, and the payments feature compares the 4 gateways. If something here does not behave the way this guide describes, the support team can help.
I hope the first donation through it is a generous one.
FAQ
Does the form need a PayPal Business account?
Yes. The REST API app, its credentials and its webhooks are created from a Business account in the developer dashboard. A personal account can pay through the form but cannot receive through it.
Can the form charge a fixed amount instead of a donor-chosen one?
Yes. Put a number such as 25.00 in the Amount box on the Payment tab instead of a field reference. The Product purchase (PayPal) template is set up that way.
What happens if someone pays but the webhook never arrives?
The submission stays pending and no emails are sent. PayPal retries webhook delivery, and its dashboard lets you resend an event. Once the event lands, the submission is marked paid and the actions run.