
How to Connect FluentCart to MailerPress: Tag Customers When an Order Is Paid
Connect FluentCart to MailerPress through Core Forms so a paid order adds the customer to a list or tag, with the consent rule up front: buyers who never opted in are never subscribed.

FluentCart sells the product and MailerPress sends the email, and the thing every store wants between them is simple: when someone pays, mark them as a customer in the email tool. So, if you are looking to connect FluentCart to MailerPress on a WordPress site, this guide can surely help, and it starts with the rule that decides how the connection behaves.
I build Core Forms, and the bridge between the two plugins ships inside it. Every screen here comes from a test site running all three.
The rule is this: a purchase is not marketing consent. The bridge adds a list or a tag to a contact MailerPress already knows. It never creates a contact from an order, and it never changes anyone’s subscription status. A buyer who did not opt in stays out of your newsletter, and that is the design, not a gap.
One guide cannot cover MailerPress automations or FluentCart’s own email settings. But the connection itself is 2 dropdowns, and in this one I will try my best to cover what it does, what it refuses to do and how to check both. Without further ado, let’s get started.
What the Bridge Does
When FluentCart marks an order as paid, the bridge looks up the buyer’s email in MailerPress. Then one of 2 things happens:
- The contact exists, so the bridge adds the list you chose, the tag you chose, or both, and updates the first and last name. The subscription status is left exactly as it was.
- The contact does not exist, so the bridge does nothing at all. No contact, no list, no tag.
That second branch is the one to read twice. It is what keeps a store from turning its order table into a mailing list, which in most countries is not allowed without a separate opt-in, and it is why the settings screen says so in its first sentence.
Set Up the Connection
The bridge appears in Core Forms settings once both FluentCart and MailerPress are active:
- In MailerPress, create the list or the tag you want customers to get. Here it is a list called Customers and a tag called Buyer.
- Go to Core Forms > Settings and find Fluent Cart + MailerPress.
- Choose the list under Add to list, the tag under Apply tag, or both.
- Click Save settings.
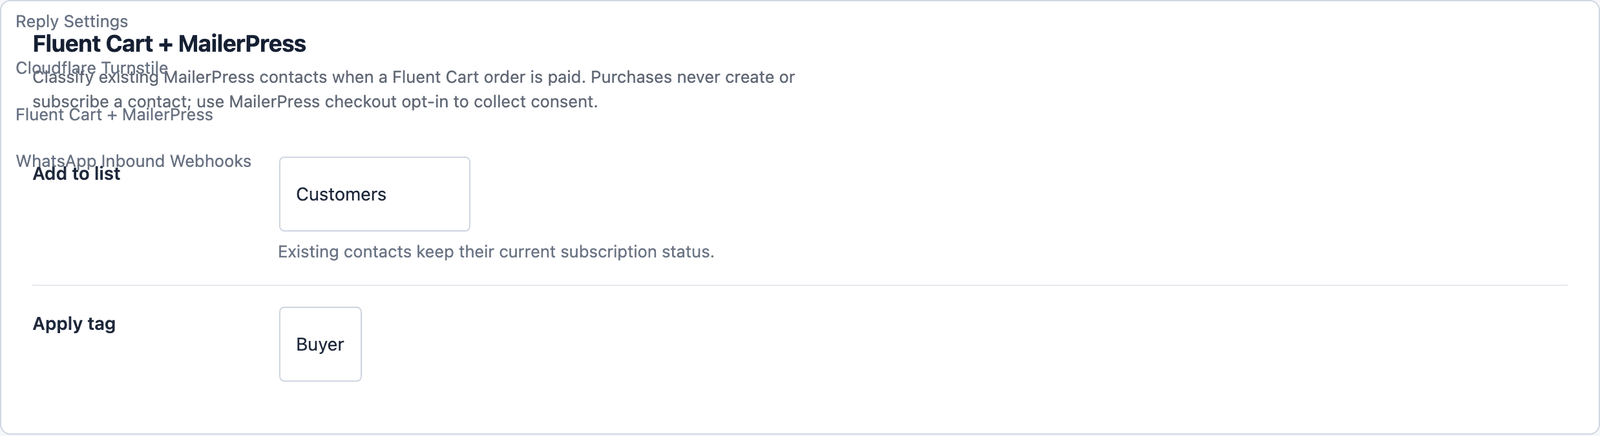 Leaving both dropdowns empty switches the bridge off. There is no separate toggle.
Two dropdowns is the whole configuration. There is no field mapping, because the only fields that cross are the email, the first name and the last name, and MailerPress already has those columns.
Collect the Consent First
Because the bridge only touches existing contacts, a customer has to be in MailerPress before they buy, or nothing happens on payment. The place to get them there is the checkout itself.
MailerPress has a checkout opt-in for FluentCart. A buyer who ticks it becomes a MailerPress contact with a recorded opt-in, and the bridge then classifies that contact the moment the order is paid. A buyer who leaves it unticked is not in MailerPress, so the bridge skips them, which is the outcome their choice asked for.
The order of events matters and it is worth saying plainly: opt-in creates the contact, payment classifies it. The bridge never does the first job.
What the Contact Looks Like After an Order
On the test site, a subscribed contact named Priya was in MailerPress before an order, on the default list with no tags. After a paid order with her email, the contact has the Customers list and the Buyer tag added, and her status is still subscribed. A second paid order with an email MailerPress had never seen created nothing: the contact count stayed at 1.
That is the whole behavior, and it is the behavior to check on your own site before trusting it:
- Put your own email in MailerPress as a subscribed contact.
- Place a test order with that email and mark it paid.
- Open the contact in MailerPress and confirm the list or tag arrived and the status did not change.
- Place a second test order with an email MailerPress does not have, and confirm no contact appeared.
Four checks, 10 minutes, and you know exactly what the bridge will do with real customers.
Use the Tag in MailerPress
Once paid customers carry a tag, MailerPress can act on it:
- A segment of contacts with the Buyer tag, for a customers-only announcement.
- An automation that starts when the tag is applied, for a welcome or onboarding sequence.
- An exclusion, so a launch campaign goes to subscribers who have not bought yet.
The list and the tag do the same classifying job. A list suits a newsletter that only customers should get, and a tag suits automations and exclusions. Using both costs nothing.
The Limits
The bridge never creates a contact. If your MailerPress checkout opt-in is off, or a buyer leaves it unticked, the order changes nothing in MailerPress, and there is no setting that changes that.
It never changes subscription status. An unsubscribed contact who buys again stays unsubscribed, with the list or tag added to a contact that will not receive campaigns until they resubscribe themselves.
It classifies on paid orders only. A pending, failed or refunded order does not apply the list or tag, and a refund does not remove one.
It carries 3 fields: email, first name and last name. The products bought, the order value and the order date do not cross, so a “bought product X” tag needs a MailerPress automation on its own FluentCart trigger.
One list and one tag. If different products should get different tags, that is again a job for MailerPress automations, not this bridge.
What Quietly Ruins the Connection
Expecting the bridge to build the list. It classifies contacts that consented; it does not make contacts out of buyers. If MailerPress stays empty after orders, the opt-in at checkout is the thing to look at.
Adding a filter that sets the status to subscribed. The bridge strips any status change that a filter tries to add, on purpose, so the attempt does nothing except confuse whoever reads the code later.
Using the Customers list as a general newsletter list. A contact on that list bought something, and the campaigns sent to it should read that way.
Testing with an order that is not actually paid. The bridge listens for the paid event and nothing earlier, so a pending order proves nothing either way.
Final Remarks
You now have FluentCart telling MailerPress who paid, through 2 dropdowns, with the consent rule doing the work that keeps the list clean. If you keep one idea from this guide, keep this one: opt-in creates the contact and payment classifies it, and the bridge only ever does the second half.
The FluentCart integration page and the MailerPress integration page cover what Core Forms does with each plugin on its own, and the guide to selling WordPress plugins from your own site covers the store side. If something here does not behave the way this guide describes, the support team can help.
I hope the Buyer tag fills up steadily.
FAQ
Does the bridge subscribe buyers to my newsletter?
No. It adds a list or a tag to contacts that already exist in MailerPress and leaves their subscription status alone. Consent is collected at checkout through MailerPress’s own opt-in.
Can I tag customers by product?
Not with this bridge, which applies one list and one tag on any paid order. MailerPress automations with a FluentCart trigger can branch by product.
What if I only want a tag and no list?
Leave Add to list empty and pick a tag. Either dropdown on its own is enough; both empty switches the bridge off.