
UX
Multi-step forms: when they help vs hurt
Choose multi-step forms for meaningful groups of questions, build them visually in Core Forms, and test whether the layout helps people finish.

Multi-step forms can make a long application easier to navigate. They can also add needless clicks to a short contact form. Group questions when the groups help people understand the task.
Core Forms lets you build those steps visually. Before splitting a form, remove unnecessary questions and decide whether the remaining work needs separate sections.
Choose steps by task, not a field-count threshold
There is no universal conversion lift or field count that makes multi-step mandatory. A short form can ask a difficult question; a longer form can contain easy, familiar answers.
- Keep simple newsletter and contact forms on one page when the fields fit comfortably.
- Group application or intake questions by purpose, such as contact details, requirements, and supporting information.
- Compare completion and answer quality with a similar audience before declaring one layout better.
The short-form versus long-form guide explains how to judge the work behind each question.
Why it works
Three psychological forces:
1. Commitment escalation. Once a user has filled in step 1, they’ve invested. The cost of bailing in step 3 feels higher than the cost of bailing on step 1. That investment can encourage completion, but it does not guarantee it.
2. Smaller perceived effort. A 12-field form looks intimidating. Three groups of four fields each, with progress dots, looks tractable.
3. Progressive validation. You can validate step 1 before showing step 2. The user sees errors one chunk at a time, not 12 errors all at once.
These can reduce uncertainty on longer forms. On a short form, extra navigation can outweigh the benefit.
Why it fails on short forms
A two-field “name and email” signup, split into two steps:
- Step 1: Email.
- Step 2: Name.
The user has to navigate to another screen for a question that could have been visible from the start. That is extra work without a clear benefit.
The same form on a single page: type email, type name, click submit, done. No friction.
Don’t split forms that don’t need splitting. Choose the structure for the task and audience.
The Core Forms multi-step setup
Build multi-step forms in the visual editor. Choose a layout, name the steps, and put each field where it belongs. You don’t need step shortcodes or custom navigation HTML.
- Open your form in Core Forms and select Visual in the fields editor.
- Set Form layout to Multi-step.
- Select a step and enter its Step name. Use Add step for each additional group of questions.
- Select a step’s tab, then add its fields. To move an existing field, select it and use Move to step in the field settings under General.
- Use Move step earlier or Move step later to change the order. Submit buttons stay in the final step.
- Click Save fields, or use Save & preview to save and open the form preview. Check the required fields, move forward with Next, then use Previous to confirm earlier answers stay in place.
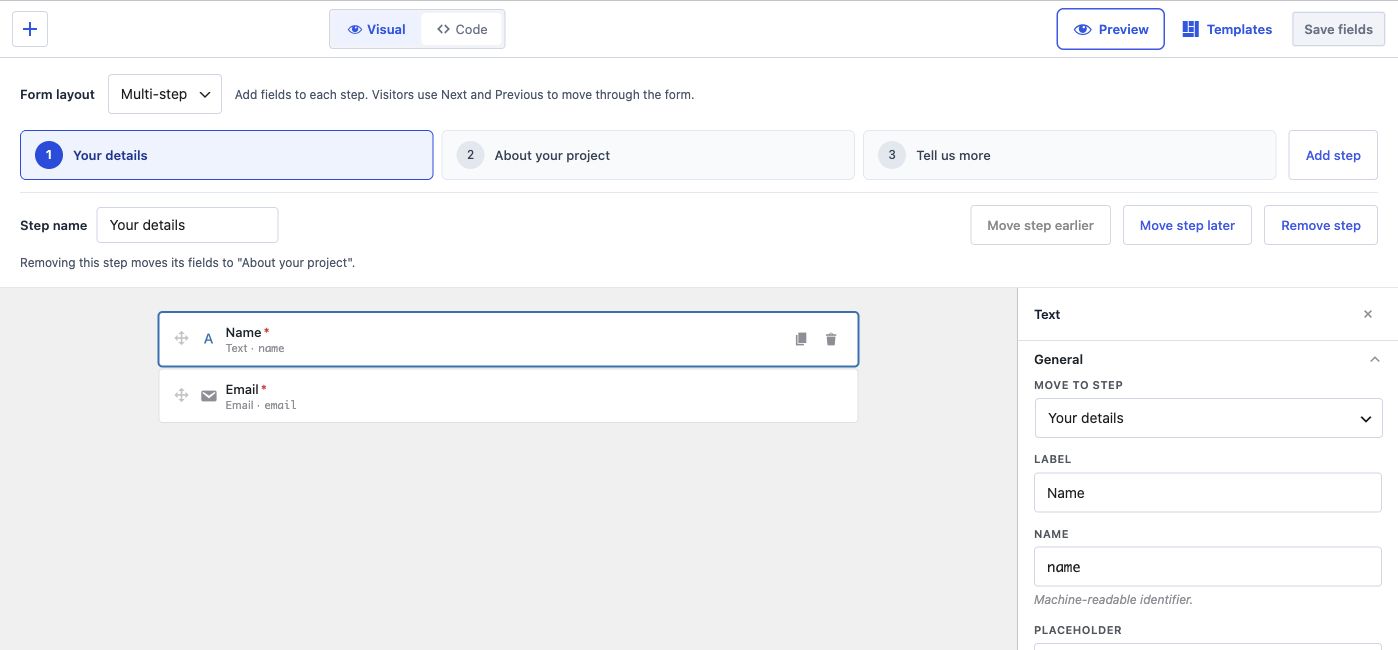
For a project inquiry, group the fields like this:
| Step name | Fields |
|---|---|
| Your details | Name, email |
| About your project | Project type, budget |
| Tell us more | Description, submit button |
Visitors see a progress indicator and step labels. Next validates the current step before advancing, and Previous lets them go back. Core Forms supplies the navigation automatically.
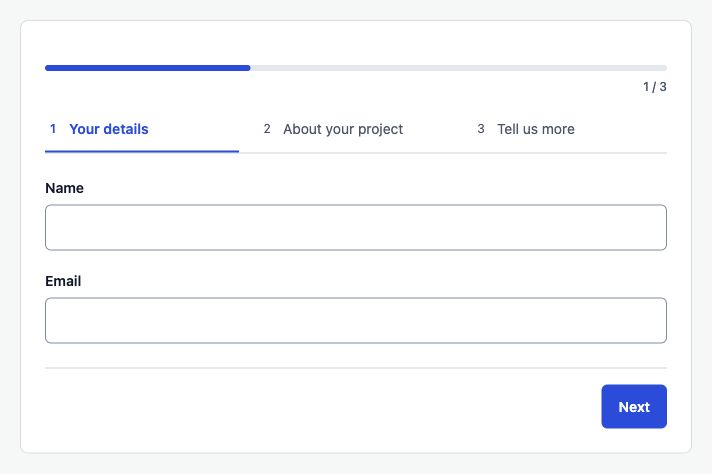
If you copied a [cf_step]...[/cf_step] example, remove those delimiters and arrange the fields visually. cf_step is no longer supported. Core Forms now uses the visual step editor. The [cf_form] shortcode still works for embedding the completed form, as does the Core Forms block.
The visual step editor is included in Core Forms. See the multi-step documentation for more details.
Match the layout to the work
The industry templates in Core Forms ship as 3-step forms, and the construction bid form, hotel booking form and auto repair form guides each show the same form collapsed to one page, so you can compare the two layouts on a real form.
Use the purpose of the form as a starting point:
- Newsletter signup: keep the email field and any necessary consent together.
- Contact form: keep contact details and the message together unless the request needs a longer intake.
- Demo request: ask only what the team needs to prepare; test separate steps if qualification makes the form long.
- Application: group eligibility, background, and supporting information when those sections make the work clearer.
- Post-purchase intake: consider both named steps and a tested way to save and return.
Short surveys and quizzes sit at the other end. When each question deserves a screen of its own, full-screen forms show one question at a time instead of grouped steps.
Save-and-resume needs a return-link workflow
In Settings → Save & resume, enabling Drafts allows Core Forms to save field data and the current step. Saves happen after input pauses and during multi-step navigation. The default draft expiry is 30 days and can be configured.
The current frontend does not automatically email or display the return link. A custom integration needs to deliver the resume_url returned by the draft-save endpoint before visitors have a dependable leave-and-return workflow. File selections are not automatically persisted for later recovery.
Read the save-and-resume guide and test the complete recovery path before promising that applicants can finish on another device.
Anti-patterns
1. The 8-step “personality quiz” form for a $20 product. Length should match commitment. A user buying a $20 ebook isn’t completing 8 steps of qualification. Match the form weight to the offer weight.
2. Required fields on every step. Some users can’t answer step 2’s questions yet. Letting them skip and return saves the lead. Mark genuinely-required fields, leave the rest optional.
3. Hiding the total step count until step 1 is done. Users hate this. Show “Step 1 of 4” from the start. Honesty about the form’s length doesn’t hurt completion; surprise hurts completion.
4. The “submit” button on a step that’s not the last. Looks like submit, behaves like next. The user clicks, expects to be done, sees more fields, bounces. Use clear “Next →” labels until the actual submit step.
Compare layouts with a consistent audience
Keep the questions and offer constant when comparing single-page and multi-step versions. Where possible, split comparable traffic between versions over the same period; running one version this week and another next week can mix layout effects with changes in audience or campaign.
- Define a start and a successful completion consistently.
- Compare completion rates and the usefulness of the answers.
- Check validation failures and where incomplete sessions stop.
- Record the layout change so later reports have context.
Core Forms already includes form analytics for funnel metrics and field-level drop-off. Field drop-off is a clue about where a session stopped, not automatic proof that a particular step caused abandonment.
The next step
Pick one form that feels difficult to complete. Remove unnecessary questions, group the remaining work by purpose, and compare the resulting experience.
Multi-step is one of the few UX patterns where the right answer is measurable. Don’t guess. Set Form layout to Multi-step in Core Forms’ visual editor, group your fields, and preview the result before adding it to your page. The multi-step form guide walks through the builder click by click.
The progress bars piece covers the one part of a stepped form that can lie to the visitor.